Thursday 22 December 2016

A VirtualMEC reality

Click on any of the photographs to enlarge!

It is the last few days before Christmas and the last of the preparations are being hurriedly thought about, by me, and carried out by Sue. Cakes are being cooked and the Christmas tree is making the place feel like Christmas. At this time of the year Meccano thoughts are on the Christmas Challenge that has become a regular feature in the Spanner II list.  It usually causes a lot of debate and can take weeks for the rules to be clarified. It seems to be a bit of a tradition. This year, I took the bull by the horns and jumped in to proposed a Christmas Challenge much earlier than is the norm, expecting nothing more than for it to take an age to get under way.

Sue's Christmas fireplace
To my surprise it all fell into place and we were off. The simple rules of the competition can be found HERE, if you would like to take a look. Models are exported into the NZ Meccano Gallery where Bob T. does a splendid job of sorting out all the pictures and displaying them next to the manual model they are based on. There is also a voting system to establish viewer's favourite model. No prizes are given but the top place is where everyone aspires to be, come the 31st December. I usually end up in the middle of the list, if I actually get around to entering. We will not talk about the year Sue came third with her Santa's Fireplace complete with Christmas stockings hanging up. My Derrick came fifty-third.

One of the first people to enter the competition this year was Douglas Laing from Johannesburg. Douglas had submitted a VirtualMEC drawing of a Hammer Head crane. Unfortunately I found myself in the unenviable position of having to disqualify it for not complying with the rules. Christmas challenge aside, the model was very appealing and I decided to have a go at building it. Luckily my disqualification of his entry was taken with good grace and we started corresponding regarding the build. Douglas sent me his VirtualMEC model file and it was then that the wheels started to come off of this plan. The original 'still' from the drawing is shown on the right. VirtualMEC has its limitations and one of them is that nobody taught it how part no. 40 works. For those without an encyclopaedic knowledge of meccano parts numbers, that is a Hank of Cord - String to you and me!

It is very easy to draw parts in impossible positions without realising it. The trading of e-mails between London and Johannesburg began and progress was made slowly. The other thing to come out of this was the realisation that the VirtualMEC program had no 'gravity' and what would stand up in the virtual world would not necessarily do so in reality.

The Build     

I started with the tower as that looked simple enough. And it is if you have all the parts. Closer inspection reveals the bracing is actually 5½ inch narrow strips. Who has twenty-four of those laying about? Even we don't have that sort of quantity to hand. These parts were not included in the sets and were only available as spare parts, which were hard to come by even when Meccano were selling spares. In fact they are so thin on the ground around here I know exactly how many we have and exactly where they all are. There are thirty-four of them built up in Sue's replica Ferris wheel dealer display model and just two more sitting in the drawer.

The top of the tower showing the
overlapping 3 inch narrow strips
joined behind the washer
Can you believe it, we are overrun with most parts in this house (so much so we are selling off our surplus at RalphsShop.com) and the first thing I look at is one of the very few parts we are short of. Luckily there is an easy work-around. The point at which the bracing crosses is detailed with a large washer. This means the 5½ inch strips can be replaced with two 3 inch strips overlapped by one hole and secured with the bolt that is used to fit the large washer. It was at this stage when it dawned on me that the top and bottom of the tower is finished off with 4½ inch girders. Another part that is not that common and Sue had just used at least eight of them in her latest model.  A rummage around in our 'back-stock' turned up a further eight to allow me to complete the tower. So far, so good but next it was time to build the boom. Looked like a piece of cake - yeah right!

Building the outer framework was fiddly, with all those double girders, but once it was sorted out that was the easy bit. Now the fun began. Try as I might I could not get several of the narrow strips used to brace the side frames to fit anywhere near where the drawing indicated they should be. It was at this point that Douglas sent me the drawing file. Inspection of this revealed that several of the strips were indeed not aligned with the holes at all and just hidden behind the frame. In all cases the ends of the strips can be trapped between the sections of the frame. Surprisingly, this worked well and the resultant construction is perfectly rigid enough.

View from above better sows the construction
It was at this point the 'Gravity' issue became obvious. This thing was very front heavy and was going to require a good deal of weight in the back end to keep it standing upright. Not wanting to add a huge block to the back of the boom I adopted a 'thick-floor' policy and added the best part of half a kilogram of 4½ inch strips to form a floor. In case you are wondering, that is 65 strips in 5 stacks of 13!  Even that was not enough and a few 3½ inch strips were added to the inside of the back of the winding house.

Inside the winding house with the roof removed
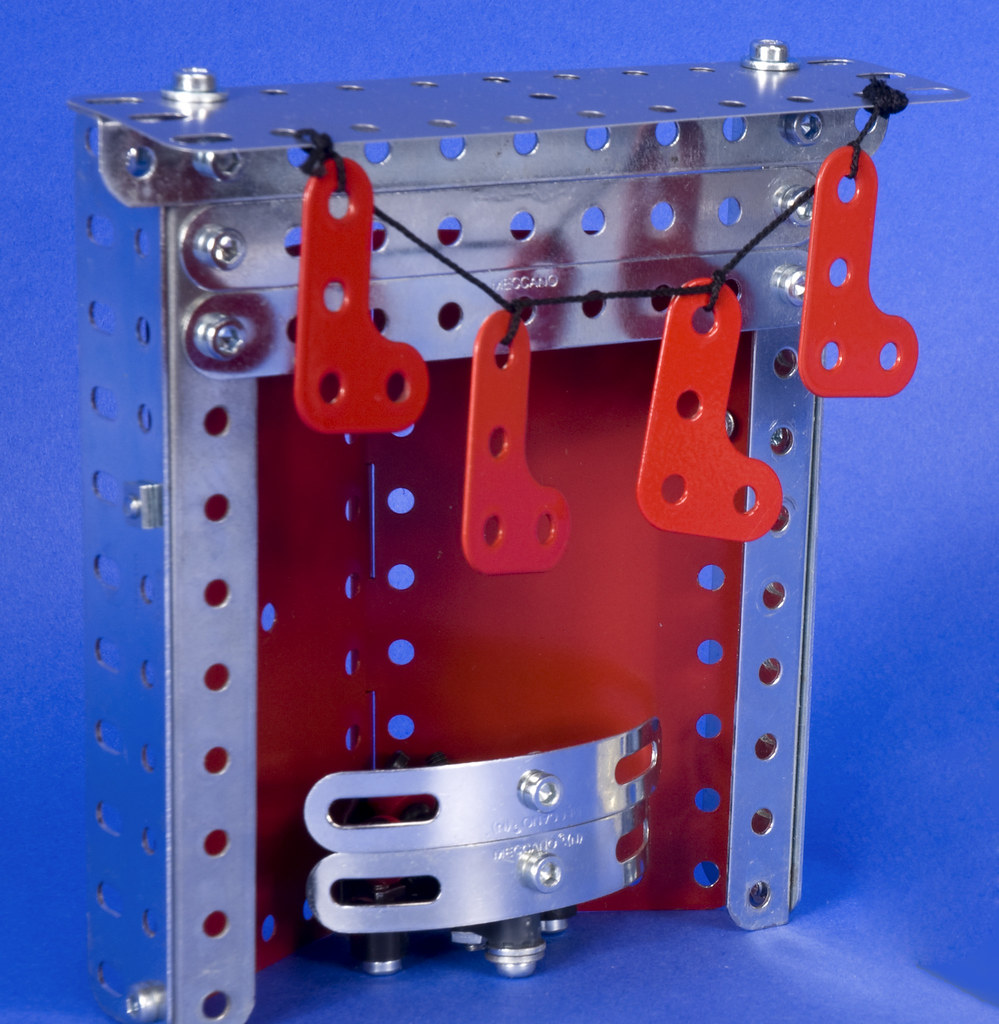
It is nice to keep a model simple, in this case the simplicity was maintained by keeping the hand operation and not getting carried away with a bucket load of gears and brassware.  However, a few improvements can make the operation easier. Guide pulleys will stop the cord chafing and aid smooth operation.  The most obvious addition is the winding drum for the hoist. This is made by forcing a couple of Chimney Adaptors into either end of a Sleeve Piece and trapping it between a couple if the small diameter bush wheels. The cord used is Ralph's String, fine. It is available in cut lengths HERE. It is anchored by passing it through one of the holes and out via the expansion slot in the sleeve piece. A double knot tied in the end of the cord will stop it passing through the slot. making a neat means of securing it. A spring forces a ½ conch diameter Bossed Pulley fitted wit an 'Aircraft Tyre'  against the inside of the Flat Plate to form a brake for the hoisting cable. Pushing the winding wheel in, against the spring, allows the drum to be wound easily and releasing the wheel will brake the drum, holding the load in place.

The tyre is acting as a brake, held against the plate by the spring seen in the picture above
Getting the tension right in the crab travel lines is crucial and is helped with the addition of a tension spring incorporated in the crab. The cord is tied to one end of the spring and then it is fed through the front bracket, around a pulley at the front of the boom and back through the crab to the winding house and under the guide pulley. There it is wound around a rod before being passed over the pulley guide this time and tied to the other end spring, under tension. 
 
The crab incorporated a tension spring
The hoisting cord passes under the lower guide pulley an out of the winding house to the crab. it then passed over the first 1 inch free-running pulley down to the block and back up again before being secured to the front of the boom ensuring the load will stay level no matter what the position of the crab along the boom.

The hook block in the original plan uses flat trunnions in the usual configuration to make the block. However in this scale I felt it looked a little too bib so I made a slightly lighter one using a pair of brass  ½ inch Pulleys without boss held between a pair of 1 inch corner brackets. A vintage red part no. 57c Hook is held between a pair of red 1 inch narrow strips. Short pivot bolts and thin brass M4 washers were used to hold the corner brackets together and space the pulleys away from the bracket to prevent them binding. Hexagonal nuts were locked together to hold everything in place, but still leaving the pulleys free to rotate. The small size of these nuts is not a great deal different from the size of the socket head bolts an therefore look better than any other solution available, such as Meccano locking nuts. A shorter 3/8 inch Long Bolt is used to suspend the hook.After assembly it was obvious that the paint in the holes of the painted parts were causing it all to bind in use. A bit on manual working in by working the pivot points by hand soon loosened it up and a few drops of oil on the pivot bolts and hook suspension gear worked wonders. 
The finished winding hose with roof
Collars were added to the ends of the guide pulley rods and a couple of 4½ x 2½ inch Flexible Plates were pre-formed on the bending machine before being secured in place to complete the winding house.

I am please with the way it turned out and it just goes to show how Meccano manual models can  models can be inspirational and lead to something completely different as the idea is passed on and evolved. Douglas said he made his drawing in an attempt to improve an old manual. Model 4.1 HAMMERHEAD CRANE from the 1951 no. 4 set.

Although Model 4.13 firm the 1962 Manual looks to be more like an ancestor of the model in his original drawing. 

Either way, as he says in his original post on the Spanner II list, it can't have wheels and be called a Hammerhead crane.

Okay, that has got the crane building bug satisfied for another little while I am off to look at making an entry of my own to the Christmas Challenge over on the  Spanner II list. If you are not familiar with Spanner II and want to know more, click HERE or follow the link in the light-blue Spanner II information box in the left hand column of this page.

Ralph

Friday 16 December 2016

Clockwork Truck

Click on any of the photographs to enlarge!

At the Hainault Hangout, the premier Meccano show in east London, my other half spends his entire day extracting money out of people for raffle tickets and competition entries. One of the competitions is to guess the weight and number of parts in a small model. It usually falls upon me to build the model and this year was no exception. I was looking through some old manuals for inspiration and found a rather awful looking van that looks as if it could be replicated and improved using strips instead of plates in our usual fashion. The Delivery Van was published as Plan 4.11 from a 1973, 2/3/4 manual. My initial intention was soon dismissed as I started to build the chassis. It has been said that the models contained in manuals of this period left a lot to be desired. They were not wrong. The chassis is the only part of the original model to be retained as I needed something to build on.
I set about building the rear body from 5½ inch strips and angle girders wrapped around 4½ inch squares built from 4½ inch angle girders. For some reason we seem to be very low on supply of these. We have angle girders in very respectable quantities of most other lengths. I must keep my eye open for any at the shows… Yes, I know his nibs is saying we have enough Meccano but there are exceptions. Besides I noticed the postman arrive with a box of Meccano that Ralph had won on eBay. What’s good for the gander… The rear of the body was fitted with a single opening door and a handle made from one end of a de-constructed shock absorber.  
As I was building the body I was aware the weight was starting to add up and it occurred to me that the little magic motor might struggle to cope. I was not too bothered as this was more about building a model for the competition, besides I have a very nice No.2 clockwork motor I bought a few years ago at SkegEx that I could shoehorn Under the ‘bonnet’ so to speak. Mind you that might be like dropping a big block V8 under the bonnet of my sedate Volvo estate – fun though!
I was looking at the cab details in the original instructions and decided that I would have a go at making my own. Then it came to me that we have a pile of those Multi-Set cabs. Ralph said I probably should not tell you I woke up in the middle of the night when the idea came to me. I can’t understand why. The cab is just about right and saved me messing about building one for myself. It fitted with a prototypical gap between it and the body that was an ideal location for the spare wheel. 
The model was finished off with a magnetic ‘Meccano’ badge on the front of the box-back and a hazard sticker on the back accompanied by a set of rear lights from modern Evolution Parts.

Sue

Monday 28 November 2016

Old Boiler!

No, not me, this...
Scruffy boilers are commonplace, especially the blue ones
We seem to have collected a good few boilers over the years and the blue ones seem to be the worst for wear of the lot. A few years ago, I bought a couple of clock kits from a chap that had been looked after very well indeed. All the parts were almost like new, even though they had been built, that is with the exception of the boilers. The paint is just not keyed on very well. I will get around to painting them at some point, but for now I have found a quick fix. While rooting around in the heaps of stuff we have been sorting out recently (see HERE), I found a motley selection of boiler sleeves in various colours that had been used as circular plates in rockets and submarine sets. However the ones that caught my eye were the ones used in the locomotive set of the early 2000s. These are black, a far more useful colour than lurid yellow of the submarine and far more practical than the white ones used in the rocket sets. The only problem with them is that they are not bent as tightly as they need to be to fit inside the boiler ends.
The locomotive parts need the rolled profile tightened
Just forming them with your hand will result in them bending out of shape as they will form a crease along the lines of holes. They need to be rolled but I was not sure if the process would damage the paint, which has been rather heavily applied and appears to be a powder coating.

Custom made rolling bars
A couple of years ago, I needed to form some plates lengthwise and built a new wider bending machine. You can see how it was built HERE. This machine is just the right width for this job. The rollers were wiped over with a spirit-dampened rag to remove any dust and grit from the rollers and the machine set up so the plate was just held in the rollers. the sleeve was rolled through under light pressure several times, each time increasing the roller pressure by a couple of turns of the adjusting wheel. It took several passes to get the sleeve to the required shape but, by going gradually, no paint was lost. I bent the sleeve so the ends were almost touching. This will mean the last half an inch of compression can be made by hand to fit the end into the boiler ends and hold them in place.

The finished boiler sleeve reassembled into the original boiler ends
I like the look of the black and zinc boiler. The original sleeve will be flattened out, using the rolling bars, and stripped of paint. Now all I have to decide is whether to paint it or, and here's an idea, zinc plate them. Ever since Meccano zinc plated the 5½ x 2½ inch base plates in the Tower Bridge set, I have been thinking about what other traditionally painted parts might look good plated, but that is yet another story.

Ralph.

Sunday 20 November 2016

Movin' it on...

So where do you want this lot!
For the past few months, we have been collecting Meccano together from all corners of our house and workshop, in readiness for a house move in the new year. We had no idea just how much Meccano we have collected over the past four decades. As of today we are in the process of selling-on the masses of stock we are never going to use, through our internet shop.

You will find the shop HERE!
The most interesting place to look will be the lots list that can be found HERE. We will be adding to the list, slowly to start with but over the following days and weeks we will be adding more and more. Just keep popping in to see what's new. If you really don't want to miss anything, you can sign up for notifications of product listings and/or our News pages simply by entering your e-mail address into box in the left hand column on any page of the website. You can opt in and out of the list at any time by checking or un-checking the options boxes that will appear when you click on the subscribe button. 

At the time of writing, we are working on a couple of new sections. One is Motor City where you will find all sorts of genuine motors and gearboxes from across the whole Meccano range going way back to some of the early clockwork and electric motors of the pre second world war era, through to the current offerings of the past decade or so.
We are also putting together a fixings section that will be called 'Fixing It'. This will initially feature a good selection of hex-socket head bolts and nuts. We have a good selection of bolts and lots of standard size black bolts.

In case you are wondering where it has all come from, fear not, you are not the only one to wonder. We sat down and thought about this and came to the conclusion that most of the 'modern' stuff (by 'modern' I mean parts from the 1980 to around 2013 when Meccano was bought by Spin Master) came from eBay. We have been eBayers for fourteen years. We joined in 2002 primarily to buy Meccano and buy we did.  For more than a decade it was possible to buy up lots of sets in unused condition. Most of these sets were bought and either never built and a lot were never opened. The ones that had been started were in the main, never finished. Stored away until they were ripe for disposing of.  In those early days, eBay provided a place where all that Meccano could be sold easily. It also gave us a source of modern parts which we pounced on. The trouble was we were buying whole sets to acquire a couple of parts and in order to build a good supply of those parts we also accumulated vast amounts of modern parts and huge quantities of nuts and bolts.

We do not only buy from eBay. We have bought several collections over the years, large and small. This is where a lot of our own collection has come from. This has amassed huge amounts of tatty old Meccano. Some of which we refurbish for our own use, the rest we sell  at meetings and shows in boxes for a few pounds, the rest we will be putting on eBay as lots that weight to a maximum of 2kg (including packing) to keep postage charges reasonable.

Talking of shipping charges, we have simplified that on RalphsShop.com  for UK buyers. No matter what you buy from the shop you will never pay more than £3.00 shipping for each order, so the more items you add to the shopping basket at each visit the better, as you know you will not be charged a fortune for delivery no matter how heavy the order is!

That's enough of that, back to the building!

Ralph.

Sunday 23 October 2016

Big Wheel in action at HTMC meeting

Yesterday we were at the Holy Trinity Meccano Club (HTMC) meeting at Hildenborough in Kent. While we were there, we had a go at videoing the Big Wheel running using Sue's compact camera. I am not versed in the art of video so this rather poor 56 seconds is the result. At least it does show the model running reasonably slowly, and the official fireman/cameraman in action.


There was a lot of interest in the smell! As soon as the engine was fired up it drew a small crowd of People, most of whom were revelling in nostalgia for a bygone age of meths fired steam toys, Sue said it reminded her of Tilly lamps (!? - She obviously didn't have a steam engine as a kid)  and shockingly there was a bloke in his forties who asked what the smell was! Blimey, I must be getting old!

The model was fired up several times during the meeting and once I had straightened out the chain, that had become twisted during transportation, it ran perfectly smoothly without incident.

Ralph.

Friday 21 October 2016

The finished Big Wheel

Following on from our last two posts, we made it! The big wheel is finished and has been fired up. The chains have been adjusted and the gearing modified so it runs at a more realistic speed.
Finished - The engine looks tiny against it!
Finished just in time for its first outing to the Holy Trinity Meccano club meeting, tomorrow. I am really please with this model. Sue's extra gondolas have improved the look even if we did have to revert to type and use our trademark red/zinc colour scheme I will have a go at getting hold of some more contemporary dark green strips to replace the zinc, but for now they will do the job.

Ralph.  

Thursday 20 October 2016

Steam power for the Big Wheel


The Big Wheel built from the 1927 instruction manual shown in the previous post, has been built following the printed instructions as closely as possible. Looking at it, bearing in mind its vintage, it was screaming out to be steam powered by a 1929 vertical boiler engine.

Tatty, yes, but it goes well and has that well used look about it
Rather than build the engine directly onto the model I decided to make it as a sub-assembly that can be easily fitted to the wheel using rods and collars. The also means the engine can be packed on its own, a much safer way to transport it. It may be tatty but it would be hard to replace, not to mention expensive, these days. We do have another engine in nicer condition but that is of the earlier type and still as the Meccano branding transfer on the boiler's outer jacket, something that would have been burnt off with constant use. This later, tatty version has the branding embossed and will survive for the life of the engine.
An overhead view shows the joining rods and gearing
A strip built base (you know how we like a bit of strip-construction!) was built using 9½ inch angle girders bolted to 5½ inch angle girders to make a frame. This was in-filled with 5½ inch perforated strips to form a base. The girders are configured to have the slotted hole sides making the outer walls of the base. A third 9½ inch angle girder is bolted through the centre to add support. Orientating this girder with the slotted holes making the fixing will ensure it will not protrude lower than the outer girders that form the frame of the base, thereby negating any risk of the finished base rocking on it.

Underside showing the third girder
A selection of gears were added, it is only a guess at this stage. I have also included a clutch that is held engaged by a spring. This can be held disengaged by holding the leaver back. The reason for this is with such a large wheel to get turning, a progressive take up of the power can be controlled by letting the clutch engage gently, like when pulling a way from a standing start in a vehicle with manual transmission. The wheel should start moving without the help of a push.  Well, that's the theory.  

The clutch assembly and final drive shaft
I did build a little 'Big Wheel' a few years ago and that could be started from a standing start without the use of a clutch. It was slightly smaller than this one. Below is a short video of it running on compressed air. There is a page about running steam engines on compressed air, for those times when it is not practical or permitted to fire them up, HERE.


I digress (again). The clutch is a simple affair. a gear wheel, as it stands now is a 50t gear,  is secured into one end of a socket coupling. A 1 inch pulley, fitted with a 'rubber' ring is secured in the other end of the coupling. This runs freely on the output shaft. A bush wheel is secured to the output shaft. A three-hole coupling is fitted with two, 1 inch rods and is tightened against a couple of nuts that have been locked together on a ½ inch bolt so it is free to rotate in the centre hole of a 3½ inch perforated strip. This strip pivots on a small  triangular plate, again via a bolt, lock nutted through the end hole of the 3½ inch perforated strip. The bush wheel is locked to the output shaft in such a position that the gear wheel is still in mesh with the pinion when the pulley and rubber ring are hard against it. The lever is biased against the bush wheel with the aid of a tension spring.

The clutch assembly and lever
The idea is the clutch is disengaged, when the engine has a full head of steam, and the flywheel is spun to set the engine running. once the engine is up to speed, the clutch can be gently let out and the wheel should slowly pick up speed - We will see tomorrow.

Another view of the clutch assembly
I have yet to design the final drive and chain tensioners, but it is almost there. I should have it finished tomorrow. In the meantime Sue has been building some extra gondolas to make it up to eight.

Sue is busy making and fitting more gondolas
Can you believe with all the blooming Meccano we have in this house we can't find another thirty two 2½ inch perforated strips in pre-war green? Well, we can't. So rather than use a lighter green, which would look horrible,  we have opted for zinc strips for now.  We should have it finished tomorrow and it will be ready for steaming. We will let you know how it goes.

Ralph.

Monday 17 October 2016

Pre-war BIg Wheel

A while ago we acquired a 1930 pre-war No.6 set housed in an original 'enamelled' (painted) wooden box. I have already built the steam lorry, from parts in this set, that appeared in the 1929 steam engine instruction manual. That worked out fine and complimented the the vertical boiler steam engine of the same period perfectly.

The Big Wheel - finished as the instructions - As far as possible

Looking through the old contemporary manuals I found lots of models that I fancied having a go at there is a mass of interesting subjects to chose from. They all would have been things familiar to children of the period. I had often thought about building something from the manual even before we had acquired the set, now I had the perfect excuse.

As can be seen the illustration in the manual is not very clear in places
Recently  I have been building the Big Wheel from the 1927 instruction manual for sets No.4 -7, only to discover that the 1927 set has a lot more parts than the 1930 set. Comparing the contents two sets is interesting and somewhat baffling. I can see the point in reducing the number of strips and other parts that are included in good quantity in the earlier set, but why reduce the number of 3½ x 2½ flanged plates (Part No.53) from eight to seven? I am sure the Meccano accountants of the day made the decisions purely on cost. Even though our set is the later (smaller) set, I decided to build the big wheel from the earlier instructions as I could make up the extra parts from our building stock. I have been collecting odd bits of dark green/dark red, as they turned up in lots we have bought, for years. Where I have not been able to do this I have used some mid red and mid green parts. Amazingly they do not stick out like a sore thumb and in fact are hard to spot even when you know they are there. Interestingly they show up more in the photographs than they do in reality..

It looks very flimsy in this view - it is not!
I started to build the main frame. This is reasonably straight forward except where the gearings are for the wheel itself. The illustration is impossible to decipher and I abandoned the final stages until I had completed the wheel. This way I could use the wheel to determine at what height the bearing needed to be fitted and then finish off the top of the towers.

What a lot of struts
I have no idea how a kid in the thirties would have been able to build this model without some kind of strip rolling machine. Trying to bend the outer strips for the rim of the wheel to a smooth curve would have been nigh on impossible. No indication as to how this is achieved is even hinted at in the instructions. For me here, getting on for ninety years later, the gentle curve required in the 12½ inch perforated strips is easily formed by running them through a set of our rolling bars.

The chain drive works really well
 Once the model was fully assembled and all the nuts and bolts tightened it was an easy job to rig the chain. The wheel turns effortlessly as the gearing down is imminence. A small amount of lubricant made everything run smoothly. If you are wondering how the hub goes together here is a close up picture just to prove that sixteen struts will fit around a standard face plate.   

Close up of the hub arrangement.

That is the model built as close to the original instruction as possible. It is screaming out for a power source to drive it and I think the 1929 vertical boiler steam engine is just the ticket. Four extra gondolas would improve the look too. Watch this space...

Ralph.
   

Friday 14 October 2016

Well, I did not think it would be this long...

I have no idea where the past nine months have gone. Sue and I have been preoccupied with a pending house move. After the best part of 40 years in the same house, it is a real challenge just clearing the clutter. Although I have seen a lot worse, we do seem to have collected a lot of 'stuff', Meccano making up a good percentage of the afore mentioned stuff!

In the late 1970s and early 1980s Meccano parts we not easy to get hold of and if they were available, they were not cheap. For years Sue and I would buy any odd box of meccano we found at boot fairs, auctions etc. When eBay came along we managed to increase our building stock considerably. Over the course of a decade or so, we amassed a huge collection of traditional and new parts. Those parts were diligently sorted and 'filed' away into our storage system providing a readily available building stock and a substantial back-stock.

Just a few of the boxes and boxes of traditional parts collected over several decades
I have said before that our early collecting of stock parts was all about traditional Meccano. By this I mean mainly the Binns Road production. By the early 1980s Meccano had all but disappeared as we know it. Under the ownership of Airfix, Frank Hornby's Binns Road factory had been reduced to rubble, manufacturing had been moved to France and the toy that we had turned into a hobby had all but disappeared. When Airfix went to the wall, in January 1981, a management buyout was rejected by the receiver and the company was eventually sold to General Mills to be operated here in the UK by its toy division based in Coalville, Leicestershire trading as part of the Palitoy Company.

Early 1980s sets contained these yellow boxes
This was the point at which I had decided that modern Meccano (of its day) was not for me. The horrible sets of that time were full of stickers and very little else. From that day on I barley gave the current Meccano a second glance, even though it was changing for the better. It is ironic now to think that the only things of use to come out of that period were the yellow storage boxes with their metal lids that are now so sought after. Indeed, we have several stacks of them, being used for storage, ourselves. Our personal life was going through a period where Meccano was not a priority. We had been a victim of the Airfix collapse as I was owed several thousands of pounds for freelance work I had done for the company that, as it turned out, I was not going to see one penny of. All our efforts were concentrated on keeping our heads above water.

As time went on we were able to drag ourselves out of the mire and in time became available to indulge in our hobbies once again. It was at this time I managed to fulfil that childhood dream of owning a No10 Meccano set. This was a rather used 1950's red/green set in the iconic wooden chest. For a few years, Meccano was back in the forefront of our thinking. In the mid 1980s Meccano was not so easy to come by and it took a lot of finding but I was still not interested in anything other than traditional Meccano. By the end of the decade we were involved in our business to the exclusion of most other things and again the Meccano was mothballed.

our return to Meccano - still using traditional parts but that was all to change
Over all this time, although we were not actively building, we still managed to buy Meccano whenever we had the opportunity. This was all traditional Meccano having decided the all new Meccano was rubbish. This period of buying greatly enlarged our stock, especially of the more common parts. We eventually got back to Meccano building nearly twenty years later after we had sold our business and again found we were able to indulge our interest. By this time Sue's casual interest had grown and she was a full on builder in her own right. It was not until Sue decided to buy some current Meccano that it started to dawn on me just how much we were missing. It was at that point that we looked at the new Meccano in a new light.

Modern parts from pre Spin Master ownership have many uses
Since then we have amassed a huge collection of the post Binns Road parts made during the 1990s through to the current day. Most of this has been sourced via on line auction sites, boot fairs and auctions as well as private sales where people have contacted us through our on line presence.  It has now become evident, due to our monumental clear out of our house that we will never be able to use the vast amounts of Meccano we have amassed. For this reason, over the coming weeks and months we will be reviving our on line lots list at RalphsShop.com and selling off our surplus Meccano.

Our absence from the building scene over the past couple of years has sparked a few rumours  that we have lost our interest in the hobby. Nothing could be further from the truth.  For the recent past we have been very closely involved with Spin Master, the current owners of Meccano. This has meant we have been building and designing models behind the scenes. Most of which we have not been able to talk about at the time, for obvious commercial reasons. As time has gone on, the design team based in Los Angeles that we have been working with, have developed the system into a toy for the current market. Unfortunately this has moved today's products a long was from where they were three years ago. We were involved in the traditional period, working on contemporary models using existing parts across the ranges. The move back towards the toy market has been a huge commercial success for the Meccano company. So much so that I am having to wait for supplies of the current models as demand is outstripping supply on the worldwide stage that the modern global companies of today have to perform on.
The current sets are full of new plastic parts, that although generic in design are more like sub-assemblies than components. This reflects modern engineering and manufacture of today as well as making use of contemporary materials. Our hobby is based on a world that does not exist today in the same way that it did when Frank Hornby conceived the system. He looked around and saw constructions made from steel parts with holes in and joined together with rivets or bolts. Today it is all high-tech materials and sub assemblies - just like Meccano is being presented today.
Meccano has once again moved out of our comfort zone. Some will embrace it, others will reject it with gusto. At the moment I am wavering on the centre ground. Because of our relationship with Meccano, over the past few years, we have had a lot longer with these parts than most of you reading this today. I can report that I am no more in love with them now than I was over a year ago when I first saw them. Sue is of a similar mind albeit a bit more open then me. Meccano are moving on, out of our world and into the cut-throat world of the global toy market. Our involvement with the new stuff is becoming less and less as we get left behind, stuck in our world of how we want Meccano to be. That is fine by us as it should be by most of our fellow enthusiasts. Our world is getting smaller as the days tick by. More and more Meccano is filtering back onto the second-hand market and the dealers and reproduction part makers can supply most if not all the parts we require making the need for Meccano to make stuff we like far less significant. I should think today the worldwide community of Meccano enthusiasts is down to hundreds and how many of them buy any amount of Meccano, very few I suspect.

12t bevel gear from the new helicopter set. This is 3D printed prototype,
the production version is black in colour
It is not all bad news, those of us who still enjoy the noble art of bolting bits of metal (and plastic!) together to build models and mechanisms that, at best, are caricatures of the reel thing, have a vast inventory of parts to choose from and a never ending supply. Even some of the current sets have something to offer such as the new ultra-small bevel gears found in the latest (Autumn 2016) 20-model helicopter set.

So now you know where we have been, you can all stop worrying about us and get on with some serious building now the nights are drawing in and the days are getting distinctly cooler. As I have said, we are awaiting a delivery of current models and as soon as we get them we will be building them, exploring the potential for other modes and the use of their new parts, where applicable.

We also have a few new projects under way. I still have to tell you about the pre-war Big wheel build and my intentions to steam power it. All this mixed in with some vintage builds from decades ago when Meccano was red and green... 

 
Ralph.

Wednesday 11 May 2016

It has been a few months...

You may have wondered what happened to Part 2 of the toy fair report.  Well, It contains details of models being produced under licence and we were asked not to disclose the details without checking with the guys at Meccano. So far I cannot get an answer. So for now I will just let that one lie and get on with other matters...

As some of you are aware, we have been working closely with Spin Master to help promote the Meccano brand and to pass on any juicy information. In the beginning there was a lot of activity and it was all looking good. Enthusiasm was there and I think they over-estimated the commercial worth of the enthusiast market. Now we are closing in on the end of the third year of Spin Master ownership and I think some of that enthusiasm has waned somewhat.

The kids love this set
There is no doubt that Spin Master have injected new life into the brand. They have now produced a complete new range of construction toys. The younger user of Meccano is not using it in the same way as we did. Most models are built (if at all) to the instructions and stood on a shelf. The next purchase may be another Meccano model, but it is just as likely to be from another manufacturer, and I don't mean just Lego.

Meccano is a totally different product today and that is the only way it will be successful. Spin Master have made it a success in the toy trade, modern Meccano sells for what it is - a toy - and all the time it does that the brand will stay alive. For us, there may be some parts that we can make use of such as those new brown ball and socket parts that make up the T-Rex dinosaur's spine. Some of the sets are appealing but we are so far away from modern thinking that what Meccano sell today has very little interest to the established enthusiast.

The Meccano we turned into a hobby was a different product, as far away from today's Meccano it is possible to get without abandoning the BSW thread, imperial hole spacing and square nut - the DNA of Meccano, if you like. We still talk to Meccano and get the odd snippets of information on what is happening but so much of it is outside the scope of our hobby it starts to become irrelevant.

It is not unusual for us to go a bit quiet from time to time, it does not mean we have gone away or that we have left the hobby. We have been Meccano enthusiasts most of our life and the way we keep it fresh is not to live and die it. To prove the fact I have been plying with our pre-war No.6 set and have built my version of the Big Wheel, model number 6.5 from the 1929 4-7 manual. It did not take long to work out that the 1929 set was a fair bit bigger than the 1931 set that we have. Here is a picture of the finished thing.

Big wheel from the 1929 instruction book model No. 6.5
It makes a pleasant change to be building with familiar parts. As much as we embrace the new plastic parts there is something very satisfying about building a traditional model that will never be replaced. Now, where is that new dinosaur set?

Ralph.

Friday 29 January 2016

London Toy Fair 2016 and...

Olympia calls - The London Toy Fair
Yes, it is that time of year again when the toy industry launches its range of products for 2016. As usual, Sue and I attended the press day earlier on this week to see what is new and what Meccano are offering us for the future. But that is not the whole story, there are other places where Meccano show new product and do not necessarily release it at the London Toy fair. Last year we were all sworn to secrecy regarding the smaller G15 Meccanoid until after its début at the New York Toy Fair. Again there are Items that I cannot talk about just yet but something I can show you, as it is in the public domain even if it was not on show in London, is The Meccasaur T-Rex.

New for 2016 Meccasaur T-Rex
This interactive, programmable robotic dinosaur is set to be a kid's best friend. It is fully-programmable and comes with a security mode function, to guard and protect a user’s things! I am sure parents and kids will love this one! RSP is $109.00 in the US and the UK price is likely to be around the £100 mark meaning it is priced somewhere between the G16 and G16-KS. Yes I did mean '16'. New updated versions of the Meccanoid are to be released later in the year. These are essentially similar to the G15s but with "faster voice recognition, twice as much memory and improved programming capabilities". We have not actually had hands on any of the new Meccanoids yet, but as soon as we do we will give you the low-down.

G16 and his big brother G16-KS. You can play spot the difference by clicking HERE
to see the previous models
Also new and fighting among themselves on a table at the London Toy Fair were the new Micronoids. These are the much smaller interactive, reconfigurable and programmable robots based on a common processor they can be built and rebuilt using the parts supplied or adding any parts from other sets as you choose. Priced at under £40.00 they are bound to be popular and a great introduction for any child into the world of programming. Again, we will bring you more on these little fellows once we can get hold of some production models. 

Micronoids interact with each other
Another new set is the Boeing Dreamliner 787 This is a new type of set featuring some bespoke parts. My first thought of this were negative as I am against the use of these sort of parts but then it dawned on me. This is not new, it is just a modern version of the pre-war aeroplane sets that featured bespoke parts and were assembled with nuts and bolts. The parts were compatible with classic Meccano and the models could be modified by adding standard parts. This new model is a halfway-house featuring bespoke cockpit and fuselage sections as well as standard parts. I am not sure about this myself but time will tell.

747 - Today's aviation, yesterday's idea
As usual a whole new range of sets to replace the current sets have been unveiled. Starting with the Starter sets (where else!) and running through the themed sets. This year the emphasis on vehicles and aircraft has been complemented with animals, dinosaurs and insects, in fact all the things that kids love. There is a move towards more plastic parts and in doing so opens up the option so make evermore complicated parts, actually 'components' might be a better description of many.

Love it or hate it, Meccano is moving into the twenty-first century - See Meccano in 2016.

There are far too many new parts to list here, but a couple that need pointing out are the 'new' rubber rings that fit ¼ inch pulleys and the new caterpillar track. Before you all start shouting at the screen and raising your blood pressure, I do know that Meccano had a small rubber ring in the system before the war. However the guys in the design office probably think they invented it so I am not going to be the one to burst their bubble. The rubber ring has been around for a while in one of this year's starter sets, but as they have not exactly been readily available, and it only contained one, I am choosing to ignore that too!
Digger - I like diggers!
The new excavator set, however, not only comes with tracks, it appears to have eight of those small rubber rings too. This is a very nice little set that offers the choice of being made up as the digger or a bulldozer.
The alternative model
This should be a popular set with the kids as well as the enthusiast, providing the plastic parts are accepted as they should be. After all, we all loved the original plastic tracks and these should be even more useful with the ability to bolt parts to them.  We will be exploring a few possibilities over the next few weeks.

Tracks have ½ spaced standard holes
On the model the tracks run on the ½ inch rubber rings
Now for the news everybody was asking about last year...

The next Thunderbird

"What is the next after Thunderbird 2?" - Thunderbird 3! No other details yet, not even a mock-up box. We will let you know more details as soon as we get them.

Ralph and Sue.