Thursday, 27 March 2014

I do Like a digger!

Ready to go
If the truth be known, I am really a crane nut but Sue is not that keen. No wonder We don't often build cranes these days! If I can't have a crane then how about a digger?


Going up!
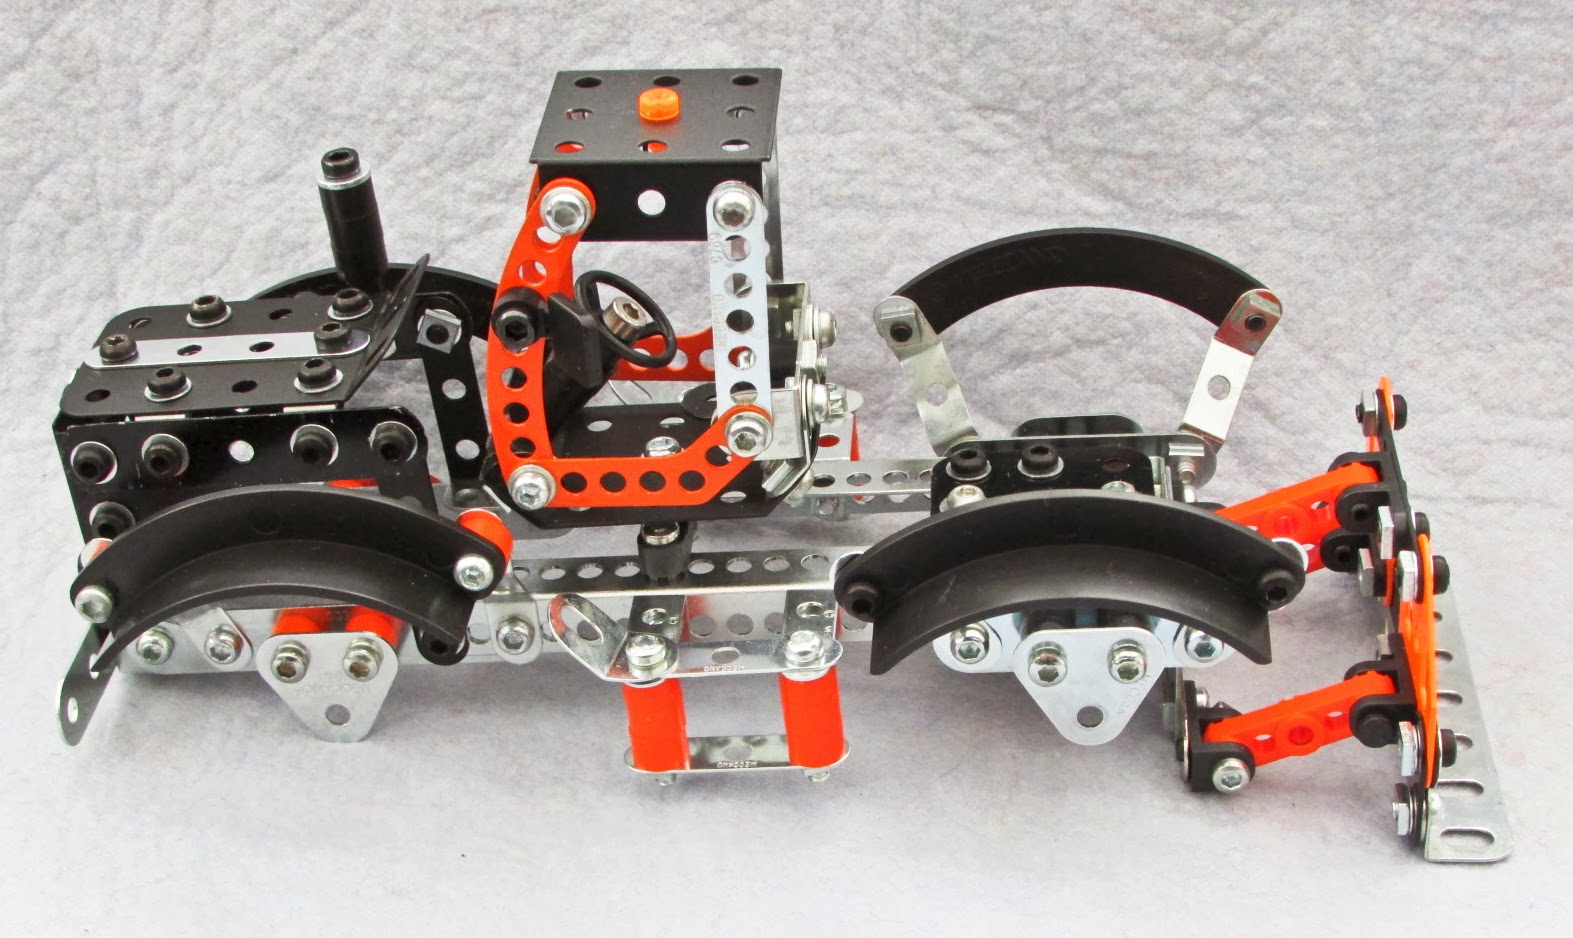
While Sue was off doing Route 66 with her Chopper Bike I was building the other new Evolution set, the Mini Digger.  I will not hide the fact that I like this one. I first saw it at the London Toy Fair and got to handle and photograph it. This little set features the new digger bucket that will also be included in the 'Rubber Duck' set, due later this year.  Included in this set is one of the new tri-axle worms and a couple of the geared mini strips. 

Looking the part and ready to work

The build

Very easy, straightforward build nothing much to say other than the screwed rods inside the simulated 'hydraulic rams' have to be tightened with some force to make the whole thing solid.  The mechanism works well once the slack has been 'wound' out; an extra washer on the worm shaft will take up some of this slack. 

The neat worm drive
Over all a very pleasing model and the smallest of the range so far. Like Sue is doing with here Chopper Bike I am off to build the alternative model...

Ralph.

Wednesday, 26 March 2014

Funny video

If you think the Rabbids are silly take a look at this spoof on the old jeans  TV advert, its hilarious!


Sue.

Monday, 24 March 2014

Evolution Chopper Bike

Looks Good on the stand...
The first new models to be released for a few months have all arrived here at Laughton Towers in one go! I immediately ear-marked the Evolution Chopper Bike to build. It looked like a nice model if the picture on the box is anything to go by. I don’t know why I tend to go for the motorbikes as I have never ridden one or even wanted to. There’s a bloke who lives down the road opposite who owns an immaculate Harley Davidson that looks and sounds great. I often see it on my way to the shops and come back home enthused, much to Ralph’s bemusement. I just like the engineering mixed with the artistry.

...from both sides
The box art model shows the new shock absorbers and the ‘V’ twin engine is convincingly portrayed. The back of the box shows the alternative model and I will have a go at that one soon. That looks more like a trial bike than a chopper. On opening, the contents are packed in plastic bags and are loose in the box. The instruction manual follows the same format as the other Evolution models in that the box-art model is featured with download instructions for the alternative. However unlike all the previous models, this one is a complete new build from the ground up, no common assembly instructions - See Evolution Alternatives.

A look at the parts list confirms the introduction of the new shockers and lots more of the new Evolution parts. This is going to be fun there are lots of small parts including 34 washers and 16 fishplates!

Let’s build
There are a few unconventional ‘moves’ here. Step 1, bolts one bit to another. That’s fine but then Step 2 requires bolts to be passed through tri-axle driving dogs but they don’t fit! They have to be screwed in cutting their own thread as they go. I was reluctant to do this at first. I didn’t need to worry as the threading does not hinder the function of the tri-axle hole at all. Construction continues up to Step 17. Here the instructions show the previous assembly being attached using an obtuse bracket. From the factory these brackets are set at 45°. Left like this, there is no way the sub assembly will fit. The bracket needs to be flattened to a much shallower angle to allow the parts to fit together.

Hold that there please Ralph...
... Thanks! The bracket need to be flattened to make it fit better

At this stage the frame needs a bit of manipulating to get everything in line and looking right before the cylinder blocks are fitted. when I was happy that it was as good as I could get it, I tightened all the nuts and bolts to be reasonably but not fully tight as I suspected the fitting of the cylinders might be a fiddly affair. In the end it was not too bad. Before any of that I needed to build them. 

Cylinder block assembly
The next step in the instructions shows the assembly of the air-cooled cylinders. The fins are represented by fishplates spaced by washers. This is much easier to do by standing the long bolts on their heads and building the washers and fishplates up, finishing up with the double narrow brackets and nuts.

On to step 21. This is where I tripped up. If you look at the diagram you will see the bolts are different lengths. I just did not notice this as I was building. Even if I had, I think I would have assumed it was a mistake. As it turned out it is perfectly correct.

Note the different lengths of the bolts
The long bolt is there for a reason that does not become apparent until later in the build, It receives the end of the rubber 'pipe' that is used to represent the exhaust pipe which is pushed on to the thread of the bolt - a short bolt is just not long enough to do the job properly.

The exhaust pipe terminates on that long bolt
The rest of the job is straightforward, if a bit fiddly. Some adjustment is required to get the wheels to run free but this is not a big problem as the model makes a good display piece in it’s own right. For a collection of relatively small parts it builds into a very solid model. Now for me it is time to tackle the Alternative model. His Nibs is messing about with a neat little digger – I expect he will be talking about that next.

Sue.        

Tuesday, 18 March 2014

Social Meccano!


If you are reading this, then you are at least in touch with the internet. As you may have gathered Sue and I are fairly active on various forums and lists as well as publishing stuff on our own blogs and websites. Until recently we have stayed away from the social networking sites. To be honest it was a fear of the unknown. As it turned out an unfounded fear. Let's look at Facebook.

Click on any of the screen-shots to go to the Facebook page!


https://www.facebook.com/Meccano
Meccano France
There are several (lots more than I thought!) Meccano-people with Facebook exposure so you will not be a lone face. It didn't take me long to find the Meccano France's Facebook page. And yes they are a friendly bunch - they were even polite about my attempt at posting in French! Don't worry about the language thing, they post in English as well as French and if it is in French, there is always a translation available! 

https://www.facebook.com/MeccanoNZ
Meccano New Zealand
From there I found Meccano's official New Zealand Facebook site. There too the natives are friendly. I have posted several items there and they even featured this bolg! 

https://www.facebook.com/BigKeithsMeccano
Big Keith's page
As well as the Official Meccano presence there are also enthusiast sites like Big Keith's page. Full of interesting stuff and worth a look.

https://www.facebook.com/pages/Sobrassmeccano/206863426190366?ref=ts&fref=ts
Sobrassmeccano's page
One of the newest pages to appear, in the last week or so, is that of Sobrassmeccano. Here is a small manufacturer of quality brass items for Meccano builders and other hobbies. There is a standard range and they will take on bespoke commissions. They also have a website HERE.    

https://www.facebook.com/ralph.laughton
Now I wonder who that is...
And you can also find us on Facebook Click on any of the screenshots to go to the various pages and say hello - we won't bite! 

If you have never tried facebook, don't let all the the non believers put you off it is full of good stuff if you embrace it for what it is. If the privacy thing worries you just don't fill in any details in your profile it is entirely up to you who sees what. There is also another reason for getting to know how social media works. here I have only been talking about Facebook but there are lots of other places to go and look or chat and very soon there will be a new place to go when Meccano launch their new Meccano Community social networking site which is due to go live any time soon....

...I will tell you more about that as soon as I know.

Ralph.

Sunday, 2 March 2014

Automatic tramway...

Part 1 - Power collection from the track

The idea behind this project is to build a small, automatic tramway that will run up and down, stop at each end, wait for a while and head on back to the other end to do the same thing again, endlessly for exhibition use. Initially this will be achieved using an electro mechanical reversing switch and a couple of diodes. I then plan, with the help of my tame geeky mate, aka Digital Tim, to add some digital control (using the Arduino) to control the speed and, maybe later, add other features - we will see how it goes.

Front and rear pick-ups
First things first, I need to build something relatively simple and make sure that works. The little tram car is taking shape with pick-ups at either end. Twin pick-ups will ensure the electrical continuity is maintained more reliably than when just using a single collector.

The pick-ups are made from Elektrikit thin brass 2 inch strips. These in fine condition can and do fetch a good price but there are plenty of tatty ones around at lower prices. These can be easily smoothed out using a set of rolling bars. These are intended for bending plates to a smooth curve, and they make a fine job of that, but we used ours far more often to straighten our bent plates.You can see how we build ours HERE.

Flattening out the brass strips
Here I have just found another use for it. The strips themselves are too thin to track through the rollers on their own but using a flexible plate as a platter the brass strips roll easily and will soon become far more like their original selves. I left them with a slight curvature to press the pick-up 'shoe' against the centre 'live rail'.

Perfect - Well good enough!
The pick-up 'shoe' is in fact a reproduction buffer. I am not sure where these came from as they arrived here at Laughton Towers in a lot, but similar items can be obtained from Stuart Borrill. A list of his stock parts, including buffers, can be found HERE.

Pick-up mounting and three-point 'suspension'
Here I have used original Meccano insulating washers to allow a fixing through the double angle strip. The bolt has a 4mm banjo tag fitted under the head that will provide a place to make a solder connection after testing. It also provides a convenient hole to attach the temporary wiring to.
Insulated washers and solder connection, used her to make a
temporary connection for testing.

The electrical return is through the body of the tram, through the wheels to the track. If the wheels were all on rigid axles the tram would rock as it traversed the track and at best only three wheels would be in contact at any one time, unless a perfectly flat track section was found. This would assume the axles were perfectly parallel to each other. Neither scenario is likely!  By supporting the trailing axle on a central pivot the tram weigh will be on the driving wheels and the pivot will ensure the trailing wheels are always in contact with the track allowing for much smoother running and electrical continuity.

So far so good, next job is to build the reversing mechanism using the new geared motor and reversing switch from the Evolution set... and some track might be useful.

Ralph.

Saturday, 1 March 2014

Not so bright...

Years ago, my dad would say "Nothing lasts!" whenever anything went wrong or stopped working, for whatever reason. The other day I found myself saying the very same thing when I turned on one or our continuous lamps we use for some of our photography.  Nothing. Not a spark of light emerged from the bulb "Nothing lasts!" I muttered to myself.

"Nothing lasts"
It was at this point that I realised I was sounding just like may dad! Sadly no longer with us, he would have been laughing his head off right now, as every time he said that we told him it was because he was getting old! Sue informed me we have had those lights for some time and it was not unreasonable to have to replace the bulbs from time to time. Before she had a chance to rub it in any further I got onto the suppliers and ordered a new pair of bulbs. The remaining original bulb was set to one side as an emergency spare.  The new bulbs arrived today and normal service will be resumed...

Hello! - Where did that come from... ?
 ... looks like it is just in time to catch the early stages of the latest project. Do you know what it is yet?

Ralph.

Friday, 28 February 2014

Somewhere else to find us...

Pinterest is a pinboard-style photo-sharing website that allows users to create and manage theme-based image collections such as events, interests, and hobbies. Users can browse other pinboards for images, 're-pin' images to their own pinboards, or "like" photos...

Our Meccano board - the first of Many...
 Lots more information about Pintrest can be found HERE.

You will find us at Pintrest too!
You can now find lots of our images on Pintrest click HERE to register. Our Meccano board can be found HERE.

Ralph.

Wednesday, 26 February 2014

This is what you get if you...

...take all the evolution models apart. Click on the picture to enlarge the image.

All the parts in one place
Just to close our series on the first five Evolution models, here is what you get when you take them all apart. Interesting isn't it! It shows just how much traditional Meccano is still used in these sets and there is a huge pile of nuts and bolts. now time to incorporate the parts into our next model...

Ralph.

The Alternative Evolution - Part 6

Aeroplane 

In profile it sort of looks like a plane...
Now we come to the largest model, and the most expensive set, of the five Evolution sets  announced at the 2013 toy fair.  At the 2014 toy fair a further four models have been announced (see HERE) and we will look at the alternatives of those over the next few months...

Does that look like an aeroplane?
The box art model is a Rescue Helicopter built in a bright Orange and white livery. Having seen the finished thing at the toy fair last year I was looking forward to seeing the production version. As with many of the models in this series the instructions included in this set have let them down. There have been lots of complaints about this model's instructions. The Alternative model instructions (downloaded from the Meccano website) are fine I didn't notice any mistakes. The selection of parts, and the introduction of a very nicely built geared motor, reversing switch and battery boxes make this set an interesting addition to the range when viewed with a parts-hungry builder's eye. 

Hmmm... as somebody said, it looks like a fat dragon fly... Oh dear!
The box-art helicopter is well proportioned and from most reports, seems to work well once the mistakes in the instructions have been circumnavigated. Unfortunately the aesthetics of this alternative model let it down. It's side profile scribes a reasonable shape but viewed from any other angle, it looks cumbersome and the propeller looks just awful. I really feel that this was just thrown together to make a second model. It looks like a helicopter that has morphed into an aeroplane and didn't finish the process! Harsh? no I don't think so. In my opinion this will do Meccano no favours with the buying public. I am sure a better model could have been designed and built. As we have worked our way through this range it has become clear the brief was to build a second model that not only used most of the parts available but also had to keep close to the original model type i.e. an aeroplane and a helicopter - both being aircraft. If the subject choice of the alternative model was not so restricted, the poor designer, tasked with the job, may have had more success producing something appealing. 

Let's build...

By now, we are getting used to the unfamiliar parts these sets proliferate in and the fact that some parts are not easy to use. The main culprit here is the inherent problem of the tri-axles. Although this is not exclusive to the Evolution range, the fact that most tri-axles seem to be fatter at the ends than along the length, is a real problem. The force required to push some parts on or over the 'fat' end is extreme.

As with all the models we have looked at thus far, the first stage of construction is the same for both models. This is a little odd in this case and for me I can't get the helicopter chassis out of my head - it just looks all wrong. It is modified slightly to produce the drive for the propeller which looks really odd to me angled down as it is. 

The new motor will find some use in other models - I like the mountings.
More on this in a later post...
The fuselage is built in outline and then a few bits and pieces are fitted (badly) into the void to simulate some solidity. It does not do it for me. The final nail in the proverbial coffin is the use of the bespoke rotor blades  crudely bolted together to make a very poor representation of the wings. You have probably worked out that I am not impressed with the look of this thing, and you would be right. Sometimes the models just don't do it for me.

If we step back here and look at the build itself. This has to be the only model that, as far as I could see, has no mistakes in the instructions. The build is easy without undue stress of the parts. I am still puzzled by the battery holders. Why could the designers not come up with a way of being able to change the batteries without having to remove the holders from the model? A big mistake and a couple of points knocked off the 'play value'  total, I fear. 

Ralph.

Previous parts of this story:

Part 5 of Alternative Evolution can be found HERE
Part 4 of Alternative Evolution can be found HERE
Part 3 of Alternative Evolution can be found HERE
Part 2 of Alternative Evolution can be found HERE
Part 1 of Alternative Evolution can be found HERE


Saturday, 22 February 2014

Pre-release Forest Engine model

George Roy has been at it again. This time pre-empting the release of the Evolution Forest Engine. George has built his model from photographs of the preproduction model we showed in our London Toy Fair 2014 report and subsequent posts here on the blog over the past month or so.  Here are George's pictures of his model under construction. No waffle from me this time - just George's pictures that say it all...


The main body assembled
Underside of the chassis
The crane...
...and from anther angle.
Blade detail
Front end
Finished - grab closed
Finished - Grab open
George has shown us just what you can do with a desire to build and a few pictures. The Evolution instructions are from the other end of the explanation scale with almost bolt-by-bolt progression through the build. I think that somewhere between these two extremes there is a sensible compomise that Meccano should seek...

Ralph.